Showing posts with label recognition. Show all posts

Wednesday, 29 December 2021

warm wishes

 hello lovely stampers!

Hope you all had a lovely holiday season - it's been a relaxing time here which has been very enjoyable!

Today I have a card for the CAS colours and sketches challenge #450 milestone celebration challenge, congrats to the CC&S team!

I chose sketch challenge #428 from July 2021 and wanted to use a newly purchased stamp set from MFT.

I couldn't resist having the cool bear in the square shape - such a cute image, and the CAS design really puts him on centre stage!

I die cut the centre square using an Hero Arts Infinity Squares die from red card. Then I stamped the image from MFT Cool Day on white card and paper pieced his sweater, Santa hat, mug and hand from various coloured papers, and glued them in place. Then this image was die cut using the next smaller size square die and glued onto the red square. The sentiment from the same stamp set was stamped directly on the card panel and the squares popped up on foam tape above. The panel was lastly adhered to a red card base. 

Such a sunny day here made the shadow quite strong! Thanks for stopping by!

Edit: Thanks to the lovely team for awarding my card as a winner for this challenge!


Saturday, 16 October 2021

sympathy

 hello stampers!

Today I made a card for the latest challenge at perfectlyCAS #20 Sympathy

I wanted to use one of the new die sets that I just received this week - one has different feather shapes and one has butterflies. I'm using a feather today and also putting this card on the NBUS blog - thanks Darnell!


I began by blending distress oxide inks with muted colours and then die cut a rectangle shape from the panel using Paper Rose Stitched Rectangles die set. I then die cut the feather using Paper Rose Feather Trio from white card. The rectangle and feather were glued to a white card base. The sentiment was stamped directly onto the card base using Altenew Sentiment Strips with distress oxide ink to match the blended colour. It was stamped 3 times using my Misti, then heat embossed with clear.

Thanks for stopping by!

*Edit: Big thanks for the recognition from the DT for choosing my card as the winner this month!


Wednesday, 6 October 2021

celebrate

 hello fellow stampers!

Today I have a card made for the 200th game over at AAA cards. Wow, that's quite an achievement - congrats to the AAA team for the awesome challenges! Keep up the great work!

Also entering the card with the lovely people at Less is More who have a colour challenge this fortnight: #453 Purple and Yellow

What's a celebration without balloons?

I started by separately blending wilted violet and scattered straw distress oxide inks, then cut out the circles for the balloons using a punch. I fussy cut 2 little tabs for the balloon tails and adhered black and white bakers twine to the back. The balloons were popped up on foam squares. The sentiment was stamped with memento tuxedo black and versamark using my Misti, then heat embossed with clear so it's nice and shiny, then was adhered to a black strip for an outline. This was popped up with foam squares also. The little white balloon 'shine' were cutouts from a diecut left in my scraps.

Thanks for stopping by!

*Edit: Thank you so much for awarding my card in the top 3 for this challenge!


Tuesday, 5 October 2021

drink on a weekday

 hello again crafty stampers!

It's time for the new challenge at the sisterhood of snarky stampers and Edna's theme this fortnight is: B is for Birthday

Edna certainly looks like she's having an f'ing great birthday, and of course why wouldn't she, accompanied by her cupcake-loving feline friend! lol

I based my card around the snarky sentiment.

I began with this amazing holographic paper - beautiful but so hard to photograph 😓 The martini glass was die cut using Paper Rose Martini Glass 3 times glued together with 1 black. The black glass was slightly offset to create a shadow look and make the glass stand up to the very busy background. The olive was also die cut 3 times for dimension. The sentiment from Tim Holtz Big Talk stickers was adhered to a black card and popped up on foam squares. 

I do love the background but it's oh so LOUD!😎

Thanks for stopping by!

*Edit: thanks to the lovely sisters for crowning my card Princess.  I am delighted! Might be martini time...

Monday, 20 September 2021

thoughts

 hello again stampers!

I'm on a roll and onto the second card challenge for today - the rain is not easing up, so I'm taking advantage of some free time!

I found an interesting challenge at As You See it yesterday where you had to complete a card in under 10 minutes AND make it funny! Oh okay...

challenge 259

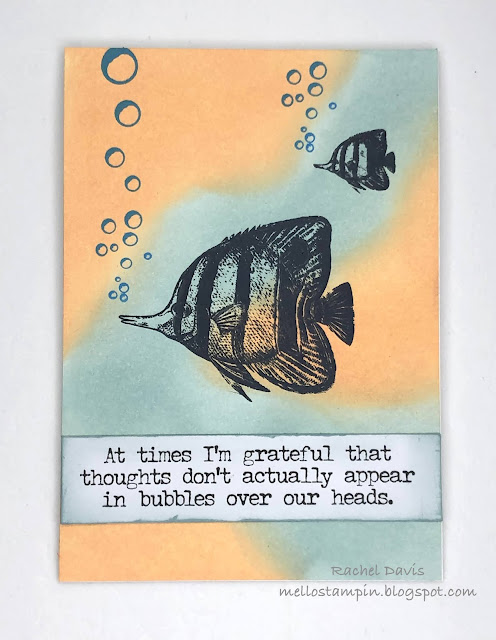
I had an idea for a card, based on a sentiment I had picked out but I had no idea how long it would take, I mean, how long is a piece of string? so I planned it out, got out the inks and supplies, began the timer and started with the first step - ink blending... Well that probably was my undoing.  I stopped the clock after 11 minutes with blurry stamping and still having not done the sentiment.  Doh!

Okay let's rethink this... I simplified the ink blending, making it only 2 colours, carefully cleaned off the stamps and made sure I didn't overink, decided not to cut down the panel but just adhere it to the card base. 2nd try was a success!


The stamps are from Darkroom Door Under the Sea, and the sentiment is a Tim Holtz Big Talk sticker. I stopped the timer at 9:22:03 but the distress oxide ink was still wet. I guess that still counts?

Great challenge! I'll be joining in more in the future for sure.

Thanks for stopping by!

honorable mention badge

Saturday, 18 September 2021

hello

 hello there stampers!

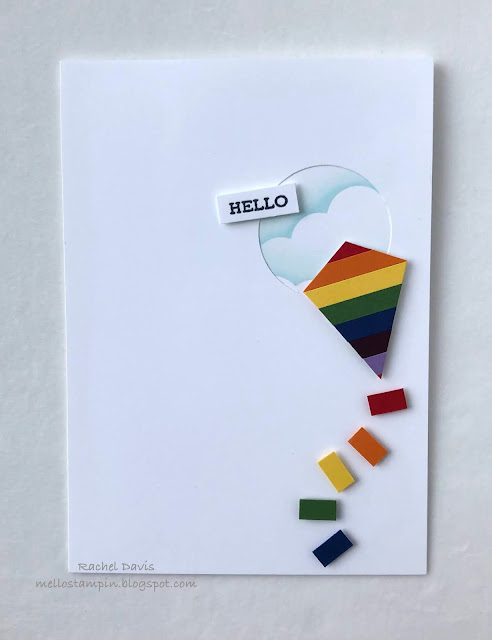
I saw the challenge over at Perfectly CAS this month and was so pleased to see Geometric as their theme.

Okay so I'll admit it. I'm a maths lover. Bring on the circles and rectangles, so awesome!


I decided on a kite as the main shape because I mean who doesn't love a perfect quadrilateral? lol I cut 1/4" strips of rainbow cards and adhered them to a white card then cut out the kite shape. I stencilled a cloud formation using MFT Rolling clouds and distress oxide ink and adhered it to the back of a panel that had a circle window punched from it.The extra bits of the coloured card strips were cut into tiny rectangles for the kite tail. The sentiment from Altenew Sentiment Strips was stamped onto white card, cut into a rectangle then all the card pieces were popped up on foam on the front panel.

I kept it clean and simple and left out the lines on the kite and tail - interestingly I think our imagination draws the lines in anyway...

Thanks for stopping by!

*Edit: I'm thrilled to be chosen as winner for the 'geometric' challenge!


Tuesday, 7 September 2021

congratulations

 hello lovely stampers!

The girls over at the Just Us Girls challenge are celebrating their 600th challenge.  Wow! So I thought a congratulations card was in order 😊 The challenge this week is JUGS#600 - 6 of anything.

One of my favourite dies is the Altenew Leaf Mix die set which I don't use nearly enough but I thought I'd use it on this card as the leaves look beautiful lined up in a row. 


Leaves were cut from a rainbow (well, 6 😁) of cardstock in various leaf shapes and mounted on a black card base. The sentiment from Altenew Ornamental Bliss was heat embossed in white on black card, layered up 3 times and glued over the leaves.  The card was finished with a few 'dew drops' from Stampin Up.

Great work, ladies, and keep the challenges coming! 

Thanks for stopping by!

**Edit: I am so thrilled to be chosen as Chic of the Week for my card. Thank you so much!


Wednesday, 18 August 2021

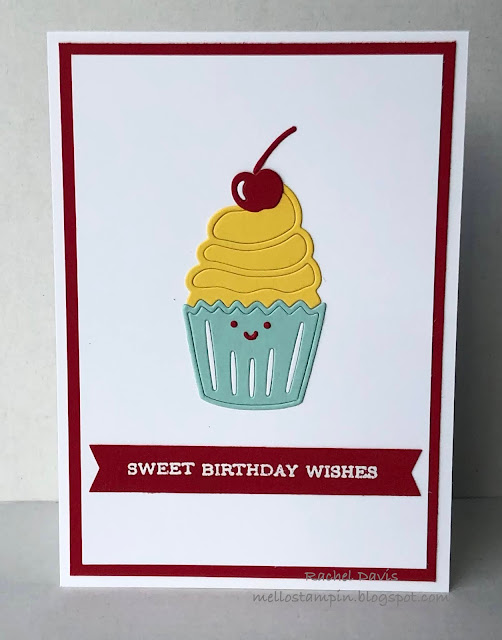
sweet

 hello stampers!

I have some birthdays coming up and have been busy making cards with some new dies and stamps. What fun! For this card I am taking on challenge #433 from CAS Colours and sketches.


My idea was for a super clean card and I used a new die from Paper Rose I recently received.


Too cute! I used real red card for the background panel, and made the die cuts several times from each of the colours plus white for the inserts. I stamped the sentiment and white heat embossed it on a real red banner piece. 

Thanks for stopping by and stay safe!

**Edit: I'm thrilled to be chosen in the weekly winners for this card!


card: real red, daffodil delight, pool party, whisper white

ink: versamark

die: paper rose cupcake

stamp: altenew sentiment strips

Monday, 9 August 2021

10 minutes

 hello snarky stampers!

This week's challenge by the good sisters at the snarky sisterhood presented a lot of options for me... the challenge thrown down by Edna is #191 F is for F words

I have totally given up on buying stamps at the moment. All this covid business has slowed down the post to a crawl, and that's if the parcel arrives at all. I don't even bother ordering from the US. My wish list is totally out of control. The last stamps I purchased never appeared and now a refund has miraculously been put into my account - Doh! I want the stamps! Needless to say I have become quite fond of surfing the net and 'send to print'.  But I digress...

Don't know about you but his face is totally how I feel some days.  😉 Nuff said.

Distress oxide ink blended over a stencil and then blended the same colours in the background. The pic and words are now dubbed digi stamps by me! Printed, glued onto card and blended lightly with the same inks.

Come have some {f}un with the sisterhood! Thanks for stopping by!

**Edit: I'm thrilled to be crowned Queen for this challenge! It was a hoot!

ingredients:

distress oxide inks: chipped sapphire, vintage photo, seedless preserves

card: whisper white, night of navy


Wednesday, 30 June 2021

guardian angel

 hi there crafty stampers!

I have a lovely little card today inspired by the latest challenge from the sisterhood of snarky stampers #188 W is for Watercolour.


I don't know why but watercolours always make me think of the ocean and undersea creatures.  All those dreamy colours and blurred edges.


The background is distress oxide inks, watered and swirled over the card panel. After stamping the main images, the panel edges were inked with speckled egg. The sentiment is a Big Talk sticker, stacked onto card and also watercolored with speckled egg. 

Come join the sisters and have some fun with watercolours! 

Thanks for stopping by!

Supplies:
inks: distress oxide inks
stamps: darkroom door under the sea, seaside inchies
sentiment: Tim Holtz Big Talk sticker

Edit: Thankyou lovely sisters for choosing me as a Princess for this card - had a ball doing the watercolour!


Monday, 31 May 2021

slightly funnier

 hello again krafty stampers! (see what I did there?)

I'm back making cards - after a hiatus due to an injured finger. Thank you for all the well wishes, it is much improved (although I still only have 9 working fingers which plays havoc with touch typing...)

Today I made a kraft card for the sisterhood of snarky stampers challenge #186 K is for Kraft-y

I found I don't often make kraft cards but the distress oxide inks look fabulous on the kraft. I will have to make more of these.


I started by stencilling the lightest blue around the perimeter, then stamped the texture stamp and another leaf stamp with darker blues over the top.  Then I stamped the birds - they are the exact same image just mirrored. The sentiment is from the Tim Holtz Big Talk sticker book, lightly blended with distress oxide ink. The panel was mounted on a dark blue card then onto more kraft. I think the blues just pop!

Such a funny sentiment when they're talking to their twin. Who doesn't love irony?

Come join the sisters, make a snarky card, and have some fun! Thanks so much for stopping by!

Supplies:

stamps: darkroom door garden birds, darkroom door flourish texture stamp

stencil: scrapmatts stones

ink: distress oxides tumbled glass, salty ocean, chipped sapphire


Edit:  Thank you so much to the snarky sisters for the Princess award for this card.  I am thrilled!


Saturday, 24 April 2021

flutter

 hello crafty stampers!

I have a card for you today that should put a smile on your face.  Purely by chance, I found the Sisterhood of Snarky Stampers blog and got such a giggle out of it, I had to have a go at their challenge. The current one is SOSS #183

Now I own zero snarky stamps, so perhaps more of a challenge for me. But I figured I'd use what words I had to convey a similar idea. I'm hoping I hit the mark!

I started by stamping the bird on ink covered card then cut him out. I blended ink for the background on a card panel, stamped around the edge and also inked the edge. Then I stamped the bird on the card panel, glued the blue bird over the stamped image. I stamped the words and inked their edges and foam taped them onto the card panel. Then glued the panel onto a card base.

I just love this bird - now he has attitude! Bit like my cat. 💙

Edit: Thank you so much for crowning me Queen Rachel for this challenge - I'm thrilled and honoured! 


Supplies:

distress oxide inks: tumbled glass, salty ocean, chipped sapphire, archival ink jet black

darkroom door stamps: garden birds, Wildflowers Vol 1, alphabet medley, flourish texture stamp

other various stamps 

Wednesday, 10 March 2021

hugs

 hello sweet stampers!

I have a lovely little card for you.  The good people at AAA Cards have a terrific challenge at the moment - one inchie! Plenty of ideas presented themselves, but fully containing it all in one inch is no mean feat. And keeping it black and white...Brilliant!


I decided to do one inch popped up on foam squares to add dimension. The tiny square can otherwise be lost in the sea of white. To add interest, I also mounted it using the rule of thirds so that the little bird's eye is perfectly at the top right intersection.


I started by stamping the bird then die cut it out. I used just a portion of the branch stamp from the same set, added the flowers and positioned the bird on the branch using foam squares to pop him out a bit. There was just enough room left for the sentiment. 

I love the one inchie - what a great idea.  I may have to invest in more tiny stamps though...

Thanks for stopping by!

Edit: Thank you so much to the AAAcards DT - I'm thrilled to be in your chosen Top Four! 


Supplies:

card: Stampin up! whisper white

ink: memento tuxedo black

stamps: Altenew under the cherry blossom tree, Altenew sentiment strips

Saturday, 28 November 2020

for you

 I was inspired by the CAS(E) this Sketch #399 challenge design this week as it forced me to think non-symmetrically!  Doesn't sound too hard, eh? I don't think I realised that most of my cards are symmetrical.  I hope that I'm growing as a card designer, so creating more cards like this can only be good for me, right?

So my rambling ideas and thoughts led me at first to be thinking of Santa with the big black belt which would form the horizontal.  But I couldn't flesh out what the white part would be so eventually I decided I wanted to do something a little more... how to describe it... artsy? 


I came up with the idea of a shadow forming the black horizontal then found myself thinking of a full moon, shining in through an open window, casting a shadow from a Christmas present - Christmas is just around the corner after all. The present had to be a big rectangular box, with the shadow elongated out from it.  Quite the challenge to position the moon to achieve this! Now I am no physicist and the shadow angles had me befuddled for quite a while, but after googling how to draw shadows, and working out the shapes formed from a box, I came up with a shadow design I was happy with.  

The box itself is 5 layers of cardstock just slightly offset, to make it appear 3 dimensional, then popped up on foam dimensionals. The moon was stencilled in whisper white ink, then a slightly smaller whisper white cardstock circle glued on top, finished off with lashings of wink of Stella for a little sparkle.

Simple shapes, bold colours, and a clean card, but showing a little montage with more depth than you get from an initial glance. I like that. A little story is lurking there somewhere.

Thanks so much for stopping by!


Stampin' Up! supplies:

cardstock: night of navy, gray granite, real red, basic black, whisper white

ink: basic gray, whisper white

Wink of Stella, black & white twine

stamp: Altenew sentiment strips (part of)


Edit: Thank you so much to the CAS(E) This Sketch team - I'm thrilled to get an Honorable Mention for this card in the challenge!


Thursday, 26 November 2020

tis the season

 Hello lovely friends.  I've got a Christmas card today. The wonderful people at The Paper Players presented a challenge this week that I found intriguing. "Use up all those little scraps" they suggested, so I did! 


Of course atm I have lots of Christmas paper scraps, but I decided to use neutral paper with a christmas stamp - just to keep you guessing! lol 


I mounted the papers on 3 layers of black cardstock, the same card as the card base. These were then arranged on whisper white card, to give the impression of shadow and make them pop! 


The sentiment was stamped on 3 layers of whisper white also. I finished it all off with rhinestones to add a little sparkle.  It is Christmas after all...  I hope I managed to make a smart and elegant card.

Thanks for stopping by!

Edit: Thank you so much for the "A Cut Above" recognition for my card! I enjoyed participating in the Paper Players challenge and am thrilled that you liked my card. Look forward to the next challenge!


Stampin' Up! supplies:

cardstock: whisper white, basic black

paper: neutrals designer series paper

ink: memento tuxedo black

stamp: retired stamp set

basic rhinestones


sentiment stamp: Altenew warm blessings


Friday, 6 November 2020

here for you

Today I used the Freshly Made Sketches challenge FMS460 as inspiration for this card. Love the simplicity and boldness of the design, so I thought I'd go with a 'dependability' theme. 


leaf


'here for you' uses a cardstock base in Whisper White. Old Olive and Garden Green strips were added as the top of the banner,  and some fronds from Forever Greenery DSP were fussy cut to make a leaf bouquet (is that a thing?) which forms the pointy banner ends.  The sentiment is stamped with Garden Green on a Whisper White strip. Dimensionals highlight the fronds and the sentiment.

I think the simple leaf fronds effortlessly posit themselves in the banner shape, conveying a dependability and generosity echoed in the sentiment. Just as leaves change from bright green to softer hues, the sense of the changing seasons is as dependable as an old friend.

Edit: Thank you so much for the "Honorable Mention" for my card - I enjoyed making it and look forward to the next challenge!


Stampin' Up! supplies:

cardstock: Old Olive, Garden Green, Whisper White

paper: Forever Greenery DSP

stamp: So Much Love stamp set

ink: Garden Green

dimensionals, stampin' seal


Thanks for visiting my blog and I hope you got some inspiration today!